
Clean Up Your Act! Proper digital mode level adjustment in Windows 10
Sholto Fisher, K7TMGArticle from the West Mountain Radio Quarter 2, 2016 Newsletter
Most of us have been guilty of this at one time or another while learning to operate digital modes but here is why excessive volume drive for digital modes is a bad thing:
Less really is more
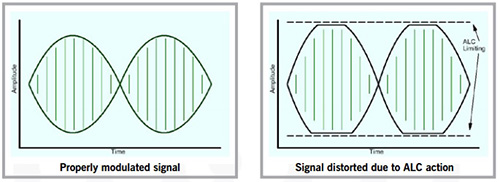
It may sound counterintuitive to hams new to digital mode operating but increasing transmit power by jacking up the volume control on your digital interface (or Windows "slider") may be the worst thing you can do to improve your chances of a QSO. What happens is your input signal becomes so big your transmitter will try to throttle-back your signal using it's ALC circuit (Automatic Level Control) so your signal is no longer completely in the linear amplification region of your transmitter. The results of this are the peaks of your transmission become flattened (or clipped) and as we know from basic radio theory anything resembling a square wave is going to be rich in harmonics...
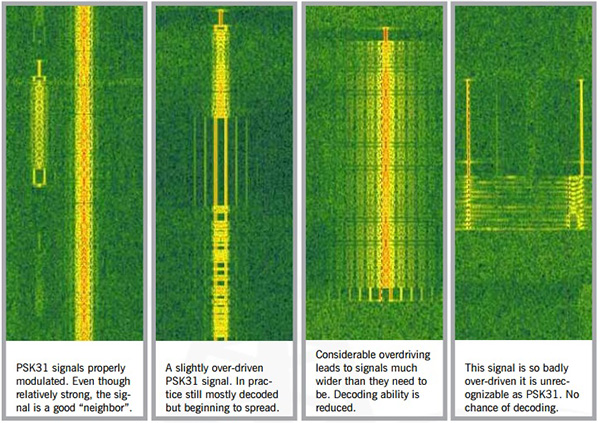
If you keep driving your audio even harder the ALC will be completely ineffective and most of your signal will be distorted which looks to be the case with the fourth waterfall picture above. You may see an increase of power out on your radio meter but this has nothing to do with how well your signal is modulated or its ability to be decoded. Worse than this is you will be not a good "HF neighbor" potentially disrupting other QSOs.
How to set your transmit drive volume optimally
Because most RIGblasters are connected to the radio's microphone jack which enables very efficient switching between SSB phone and digital modes, you first need to set your radio's MIC gain to suit your microphone and RF power to whatever you normally use for phone operation. This is usually maximum and for most radios 100W. Now this does not mean we are aiming for a 100W PSK31 signal. Far from it. Setting for maximum will give us enough headroom for our "30W" PSK31 signal without the danger of running into ALC action.
One thing to keep in mind when running digital modes is depending on the mode chosen there can be a big difference between the waveform peak power (P-peak) and the average power (P-avg). Most radio power meters are designed with SSB or CW in mind so are not particularly accurate when transmitting digital modes, especially for modes with a very high P-peak/P-avg ratio.
PSK31 has a ratio of around 0.8 (or 80% if expressed as a percentage) which means when you see 30W on the radio meter the chances are good that you are actually putting out a bit more than this. You will only be able to tell exactly how much if you have access to a PEP reading meter, preferably with a hold function.
An extreme case is the mode MT63. This has a ratio of around 0.1 or 10%. Roughly speaking an average reading power meter will indicate 10W output but your signal will be 100W on the peaks! It is very easy to overdrive an MT63 signal and this accounts for the lack of success many people have with this mode. What we want to do is to allow only enough audio drive from the computer interface to reach the power level we are seeking without any ALC indication being present on the radio. This ensures a clean, properly modulated signal.
If we take the example of the RIGblaster Advantage which has a built-in USB sound card there are a number of things we need to configure to reach the correct drive level. We have already covered two, the radio's MIC gain and RF power level but next we need to consider the volume level of the sound card itself.
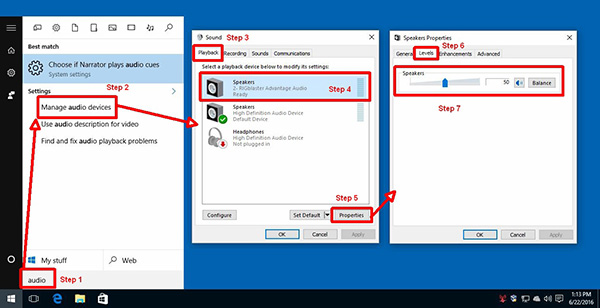
With Windows 10 it is a little more difficult than other version of Windows so refer to the screen captures.
1. Click the start menu and type the word "audio".
2. A search dialog will open and you should see an option to "Manage Audio Devices". Click on it.
3. Select the "Playback" tab.
4. Left-click (once) the RIGblaster Advantage device to highlight it.
5. Click on the "Properties" button.
6. Select the "Levels" tab.
7. Change the volume level by dragging the slider. A good value to use is 50.
Now we have set the radio RF power to 100W, the MIC gain for normal microphone operation and the internal RIGblaster sound card to 50%*. That only leaves one control to precisely adjust the drive - the RIGblaster front panel "XMIT LEVEL" potentiometer.
First set this control all the way counterclockwise. This will ensure no audio reaches the radio when we start to transmit. At this point tune up on the bands (or connect a dummy load) and launch your digital mode software. There is usually a "tune control" in the software which provides a fixed tone output and keys the radio. If not, simply select PSK31 mode and start a transmission. If nothing is typed the PSK31 idle signal will be sent which is perfect for this final adjustment.
Slowly rotate the "XMIT LEVEL" potentiometer clockwise while observing your radio's power meter and ALC indicator. You are aiming for around 30W output with no ALC showing. That is it! You have now set your digital mode transmission optimally and are putting out a clean signal of around 35W.
One last word of warning: Before setting your level or transmitting on-air remember to disable the radio's speech processor! It's perfectly OK to use for SSB phone but will totally wreck a digital mode signal!
* If you find the RIGblaster XMIT level control is a bit "touchy" when setting a precise power level, try reducing the Windows 10 volume slider to 25% or even less. There's also a jumper in the RIGblaster Advantage which can reduce TX audio by 10dB - see the manual for details.
Categories that this topic belongs to: RIGblasters