
How to Use the Windows Sound Control Panel in Windows 10 & 11
Sholto Fisher, K7TMGArticle from the West Mountain Radio Quarter 1, 2022 Newsletter
Using sound card based digital modes and other audio software can be a frustrating experience if you do not know your way around Windows. I frequently get support calls where it is obvious the Windows Sound System and its intricacies are poorly understood. I partly put the blame on Microsoft for making it less than obvious where to find important settings or even worse, removing a known method after a Windows update!
Why do we need access to the sound system?
Most digital mode audio interfaces will have an on-board sound card. Radios with a USB port also usually have a sound card too (often called a "codec"). From the point of view of Windows they are simply a USB sound card attached to the system and managed the same way as any other. Because of this sound card is used to generate audio signals suitable for transmission by radio we need to know how to set the volume, both for RX and for TX.
A sound card input channel is used for RX audio. A sound card output channel is used for TX audio. Each channel has a volume level associated with it, so it is important to understand how to adjust both. Too high a volume level and you risk a distorted transmit signal.
Too high or too low volume on receive audio could mean missed decodes or a "missing waterfall". It is not enough to simply move the volume slider using the main Windows Volume Slider icon.
Where can we access the correct sound settings?
A tried and true method of dealing with the sound system is to use the Sound Control Panel. This is a holdover from earlier versions of Windows and once understood is probably the most useful of all of the audio settings screens. Finding the Sound Control Panel can be difficult but here is a few ways you can do it in Windows 10 and Windows 11.
Method 1: Windows 10 only. Right-Click the main volume icon and choose 'Sounds':

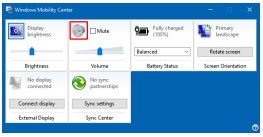
Method 2: Windows 10 & 11. Right-Click the Start button and choose 'Mobility Center'. When this appears, click the grey speaker icon:
Method 3: Windows 10 & 11. Hold down the Windows logo key on your keyboard and tap the letter R. Paste mmsys.cpl into the run-box and press the Enter key:
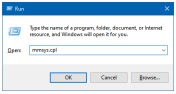
This last method could be improved upon by creating a new shortcut on your desktop which points to mmsys.cpl. Then you will always have an icon which can be double-clicked instead.
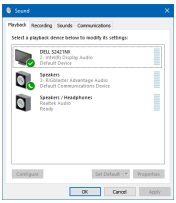
Whichever method you use the Sound Control Panel will open and you will see this:
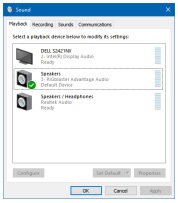
The Sound Control Panel as it appears in Windows 10 with three playback devices including a RIGblaster Advantage.
You will notice that the RIGblaster has been given a green check which means Windows has decided (usually chosen upon first connection) that the RIGblaster should be the default playback device. I really wish it would not do that!
A default device actually indicates to Windows programs which device they should use for audio if not specifically configured to use a certain device. So if you left these settings alone and started to play a movie, or listen to your music playlist, the Advantage would be the audio device it would try to use.
Obviously we do not want that to happen. The first thing we should do is to tell Windows which is the correct device, i.e. which sound card to use for default playback.
Looking at this list we can see two other audio devices listed. One is the sound card built into the Dell monitor and the other is the on-board RealTek sound card in the PC itself.
Either could be chosen for the default device but on this particular PC there are high quality speakers plugged into the Dell monitor
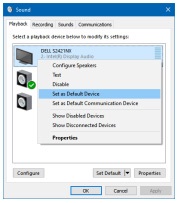
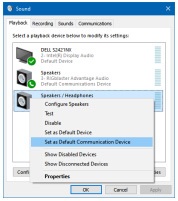
If we right-click over the Dell device we get a pop-up menu with an option to make it the default device instead of the RIGblaster.
Tip: You will also notice there is an option to Show Disabled Devices. Occasionally a device can be disabled accidentally and might be missing from this list. Choose this option so you can see all devices whether enabled or disabled.
Once we have set the Dell device to be used for default playback you should see the green check has now jumped from the RIGblaster to the Dell.
But wait! What is that? We now have another green icon on the RIGblaster that looks like a telephone. This icon indicates which device should be used as the default communication device.
What's a default communication device? This tells programs which use VoIP (such as Zoom, or Skype) which device to use for its playback. Again, we do not want the RIGblaster to be used for this so we need to move that icon too.
In this system there is a wired headset connected to the RealTek sound card and this is used with VoIP software so we want to make the RealTek the default communication device.
Now we will end up with a device list which looks like the following (hopefully!)
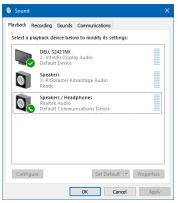
Now we can see that the Dell is the default device and the RealTek is the default communications device. There are no longer any icons on the RIGblaster device which is exactly what we wanted to achieve. This means that only the software we specifically configure to use the RIGblaster will have access to it.
Tip: If you do not use software like Zoom, or Skype then don't worry about the default communications device. You can leave the icon alone.
Background: Windows has become much more sophisticated than earlier versions and by telling it which device to use for communications it can automatically reduce the volume on other devices when a call is received. The default communications device is specified so Windows knows which other devices to change volume on.
Unfortunately we are not done yet with the Sound Control Panel. We have the Recording devices too. Clicking on the Recording tab at the top of the screen will list all the recording devices.
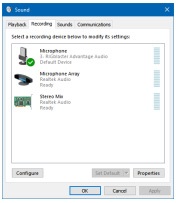
Currently you can see that the Advantage is set to be the default recording device. This is usually fine left as is but if you do use VoIP software you will want to make another device the default communications device.

Right-clicking on the RealTek device allows it to be set as the default communication device.
So now we have ordered our sound devices correctly we should set the volume levels on the RIGblaster. Remember we need to do this for both playback (TX) and recording (RX) audio.
Select the Playback tab and then double-click the RIGblaster device. Doing so brings up a properties dialog where you can set the TX volume.

I find a value of around 10-15% is about right for modern radios with a RIGblaster Advantage but you may need to experiment a little with your particular set up.
Do not forget to do the same for the RX (recording) audio!
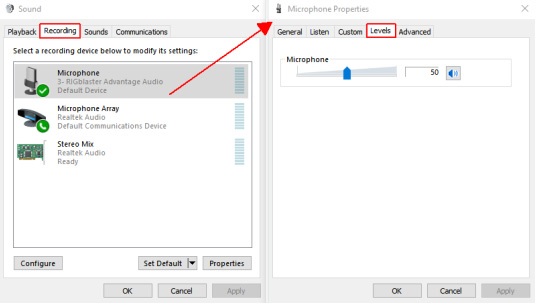
50% seems to be pretty typical and is not as critical as playback volume.
So that covers how to find the Windows Sound Control Panel, figure out your default devices, and set volume levels.
All that is left is to configure your digital mode software to use the RIGblaster sound device for both playback (TX) and recording (RX).
Categories that this topic belongs to: RIGblasters